
This is an old revision of the document!
Table of Contents
Providers
Each provider profile represents a vendor account. Each vendor account used in the acquisitions process needs a provider profile. This profile contains information pertaining to contacting the provider, claiming, EDI, and holdings subfields. Providers can be edited should information change.
An ongoing list of vendors who offer MARC downloads and/or EDI ordering is here.
Create a provider
Providers must be created in the Acquisitions module before users can create purchase orders for providers.
1. Select Administration→Acquisitions Administration→Providers.
2. Click New Provider.
3. Fill in the fields. Information on specific fields is available in the Provider Profile.
4. Click Save.
Provider Profile

- Provider name <fc #ff0000>(required)</fc>
- Code <fc #ff0000>(required)</fc> - Create a unique code for the provider. No character limit.
- Owner <fc #ff0000>(required)</fc> - The owner is the organizational unit(s) whose staff can use this provider. If all organizational units can use the provider, use the system rather than one particular branch.
- Currency <fc #ff0000>(required)</fc> - The currency the provider is paid in.
- Active <fc #ff0000>(required)</fc> - Select “active” to activate the provider. Unchecking this box deactivates the provider. Providers must be active in order for purchase orders to be created from that provider.
- Default # Copies - Enter the default number of copies
- Default claim policy - Choose the policy that best describes the policy you will use most often with this provider. This can always be changed at the line item level at the time of claiming, so it does not need to cover all scenarios. This can be left blank if no default policy is necessary for this provider.
- EDI Default - Leave blank, it will be entered by PINES staff
- Email - Provider's email address
- Fax Phone - Provider's fax number
- Holdings tag - If your provider enters holdings data in MARC records to be imported, enter “962”. Otherwise leave blank.
- Prepayment required - Check the box if the provider requires payment before goods are received.
- SAN - Leave this blank, it will be entered by PINES staff
- URL - The Web address for the provider's website
Add an additional address
A provider's address appears on printed purchase orders and invoices for that provider. Additional addresses can be added to the provider profile for providers with multiple offices.
1. Open the provider you would like to add an address to.
2. Click New Provider Address. A pop-up will appear.

3. Enter a name for the address in the Address Type field.

4. Fill in the address details. Required fields are:
- Street 1
- City
- State
- Country
- Post Code
5. Check the box next to “Is Valid?” if the address is valid.
6. Click Save.
Add a contact
The names of contacts and their specific contact details can be added to providers.
1. Open the provider you would like to add a contact to.
2. Click the Provider Contact tab.
3.Click New Contact. A pop-up will appear.

4. Enter the name of the contact, the contact's role, email, and phone number in the respective fields.

5. Click Save.
6. Click Reload.
Add an address to a contact
Addresses can be attached to specific contacts.
1. Open the Provider Contact tab.
2. Click New Contact Address further down the page. A pop-up will appear.

3. In the Type field, enter the type of address for your contact.

4. From the Contact drop down menu, select the ID number of your contact.
5. Fill in the address details. Required fields are:
- Street 1
- City
- State
- Country
- Postal Code
6. Check the box adjacent to “Is Valid?” if the address is valid.
7. Click Save.
Edit a provider
Provider information can be updated at any time.
1. Select Admin→Acquisitions Administration→Providers.
2. If needed, use the Filter to locate the desired provider.

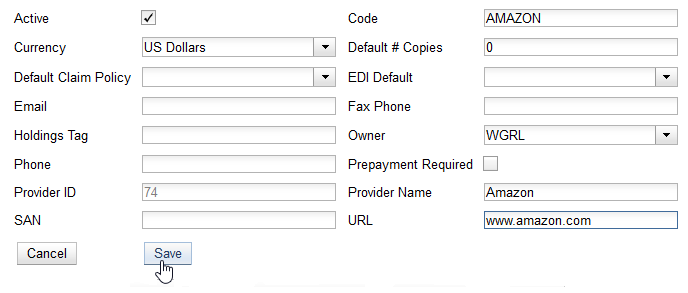
3. Click the hyperlinked name of the provider you would like to edit.
![[image]](/dokuwiki/lib/exe/fetch.php?media=acq:manual:16_providers_11.png "[image]")
4. Make your changes in the top half of the Provider Details screen.
5. Click Save.
Delete a provider
Before a provider can be deleted, any additional addresses, contacts, attribute definitions, and holdings subfields must be deleted first. You are then able to delete the provider on the Provider List page by checking the box adjacent to the provider's name and clicking Delete Selected.
You can only delete providers if no purchase orders have been assigned to them.
Attribute definitions
Not currently in use by PINES libraries.
Holding subfields
Holding subfields are used with a 962 Holdings Tag to allow you to specify subfields within the holdings tags to which your provider adds holdings information.
View a provider's invoices
1. Open a provider.
2. Click on the Invoices tab.
![[image]](/dokuwiki/lib/exe/fetch.php?media=acq:manual:16_providers_17.png "[image]")
3. All invoices for the provider will display. Use the column headers to sort. Use the hyperlinked Back and Next to advance through the pages of invoices. You can click on the hyperlinked name of an invoice to view it.