
This is an old revision of the document!
Table of Contents
Selection Lists
Selection lists enable users to add records from a variety of sources to a single list that can be converted into a purchase order. Selection lists can also be created to keep track of items that a library wishes to purchase in the future.
My Selection Lists
To open the My Selection Lists interface:
1. Select Acquisitions→My Selection Lists or choose My Selection Lists from the Acquisitions toolbar.
This,
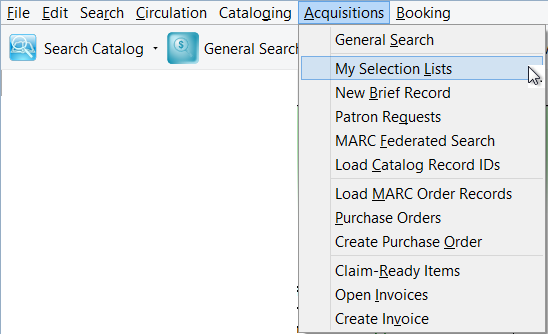
or this.

2. The My Selection Lists interface will display.

3. The following actions can be performed from this screen:
- Open a selection list created by the user currently logged in
- Create a selection list
- Clone a selection list
- Merge selection lists
- Delete a selection list
Create a Selection List
Selection lists can be created through the My Selection Lists interface. The three other areas within the module where selection lists can be created are when you Add Brief Records, Load MARC Order Records or find records through an OPAC search. In each of these interfaces, you will find the Add to Selection List choice. Enter the name of the selection list you would like to create into the field.
To create a selection list through the My Selection Lists interface:
1. Select Acquisitions→My Selection Lists OR choose My Selection Lists from the toolbar.
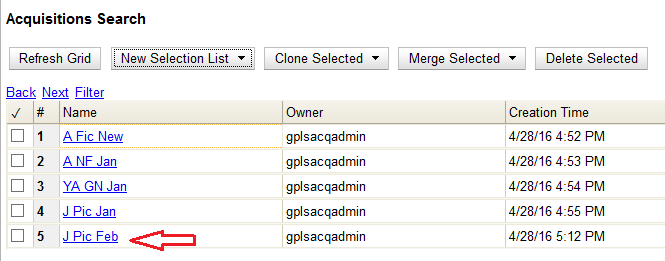
2. Click New Selection List.

3. Enter the name of the selection list in the box that appears and click Create.
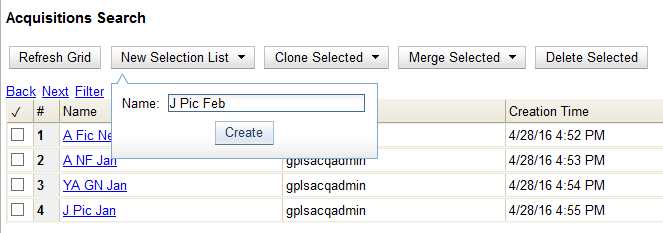
4. Your new selection list will display in the list.
Add Line Items to a Selection List
You can add line items to a selection list in one of six ways:
- Add a Brief Record
- Search for Line Items & Catalog Records;
- Load MARC Order Records;
- Load Catalog Record IDs; or use the
- View/Place Orders action in the catalog
Clone a Selection List
Cloning selection lists enables you to duplicate selection lists. You can maintain both copies of the list, or you can delete the original list.
1. Select Acquisitions→My Selection Lists OR choose My Selection Lists from the toolbar.
2. Check the box adjacent to the list you would like to clone and click Clone Selected.
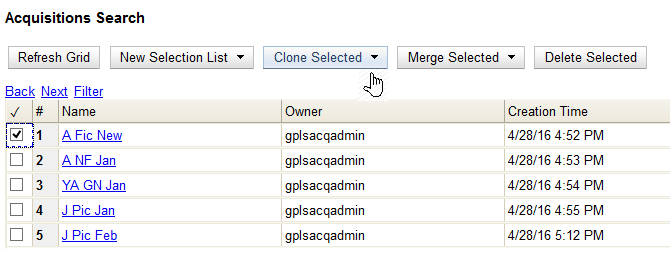
3. Enter a name for your new selection list into the box that appears and click Clone.
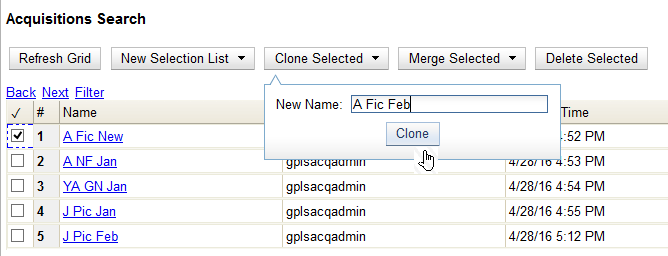
4. Your cloned selection list will display in the list. The cloned selection list contains all the line items of the original list without any copy information.

Merge or Rename Selection Lists
Merge a Selection List
Two or more selection lists can be merged into one list.
1. Select Acquisitions→My Selection Lists.
2. Check the boxes adjacent to the selection lists that you would like to merge together and click Merge Selected.
[image]
3. Choose the Lead Selection List from the drop down menu. This is the list to which the items on the other list(s) will be transferred.
[image]
4. Click Merge.
Rename a selection list
To rename a selection list, merge it into a new list that has the new name.
Delete a Selection List
Selection lists that are no longer needed can be deleted. Deleting a selection list deletes any line items not attached to a purchase order.
1. Select Acquisitions→My Selection Lists.
2. Check the box(es) adjacent to the selection list(s) that you would like to delete and click Delete Selected.
[image]
3. Your selection list will be deleted.
[image]
Mark Ready for Selector
This step is optional but may be useful to individual workflows.
After an item has been added to a selection list or purchase order, it can be marked ready for the selector.
1. Open the selection list or purchase order that contains the line items you would like to Mark Ready for Selector.
2. If you wish to Mark Ready only selected list items, check the boxes adjacent to those line items.
[image]
3. Select Actions>Mark Ready for Selector.
[image]
4. A pop-up box will appear. Choose to either Mark selected line items or Mark all line items.
[image]
5. Click Go.
6. The screen will refresh. The marked line item(s) will be highlighted light pink and the status will have changed to selector-ready.
[image]
Convert a Selection List to a Purchase Order
When a selection list is finished, it can be converted to a purchase order through the Actions menu.
1. Open the selection list that you would like to convert to a purchase order.
2. Select Actions→Create Purchase Order.
[image]
3. A pop-up box will appear.
[image]
4. Select the Ordering Agency from the drop down menu.
5. Enter the code for the Provider. This field will auto-complete as you type.
6. If prepayment is required, check the box adjacent to Prepayment required.
7. Choose to either add All Line Items or Selected Line Items to the purchase order.
[image]
8. Check the box adjacent to Import Bibs and Create Copies if you wish to import them at this time. If you don't choose this, bibliographic items will be imported and copies created when the purchase order is activated, instead.
[image]
9. Click Submit.
10. If Import Bibs and Create Copies box was checked, the import interface will open. See Vandelay interface for more information. Otherwise your purchase order will be created and open in the same tab.
[image]
Search for a Selection List
The action trigger of “Save to selection list” does not copy line items to another list–it MOVES those line items and the associated copy/PO info to another selection list. To copy items to another SL, you need to go into the main SL screen and clone the list.