
Table of Contents
Function Bar
Pages that show tables of data (patron search results, checkin screens, holds pull lists, etc.) have function bars across the top of them similar to this one:

Paging controls are located to the upper-right of the table, with arrows to navigate from page to page of results and a Page dropdown to jump to a specific page. The “Rows 100” dropdown in the example allows you to control how many rows you wish to see at once.
Some pages will also present you with action buttons (such as the Add to Bucket and Merge Patrons buttons shown in the example above, or the Actions dropdown shown in the example below). You must use the checkboxes in the table to select at least one row before you can use the action buttons.

Column Configuration
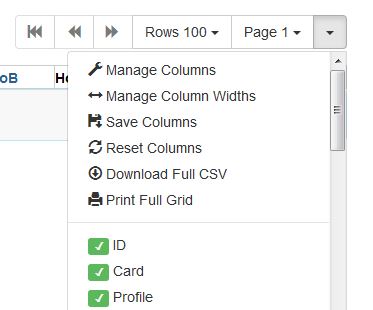
To the far right of the paging controls, the single dropdown arrow on the right presents you with various column configuration options.
Various search results tables may not default to the most useful columns. For instance, the patron search results page may be easier to use if you change the columns to Card, Last Name, First Name, Middle Name, Dob, and Primary Identification, and you may wish to have the results sort by Last Name, then by First Name.
To customize your columns:
First:
- Click on the dropdown arrow at the top-right of the grid.
- Click on Manage Columns.
- Use the checkboxes in the Visible column to select which columns to display or hide.
- Use the up and down arrow buttons to control the order in which your columns should appear.
- Use Sort Priority (if available) to prioritize how sorting should work. (A negative number will sort the column in reverse order.)
- Click Close.

Next:
- Click on the dropdown arrow at the top-right of the grid.
- Click Manage Column Widths
- Use the arrows to expand or shrink each of the columns so that the content displays as you wish.
- When satisfied, click on the dropdown arrow again and click Save Columns.
Reset Columns:
If you wish to clear your customizations and switch back to the default, click the dropdown arrow and then click Reset Columns.
Downloading or Printing Results
Every grid (aka, table) in the staff client has the option to Download Full CSV, Print Full Grid, and Print Selected Rows, available from the dropdown arrow or gear icon in the function bar.

Download Full CSV will download all of the records in the grid regardless of whether or not all of the records are currently visible. For example, if you do a patron search and retrieve 65 patrons but have your Rows set to 25, you will only see 25 patrons per page, but clicking Download Full CSV will download all 65 patron records to a CSV file, which can then be opened in Excel. When the CSV file downloads, it will download data for whatever columns you have visible.
Likewise, the option for Print Full Grid will also print the visible columns for all of the retrieved records even if they span multiple pages.
The 3.12 upgrade introduced the ability to print selected rows from a grid.
To do so:
- From the grid, select the rows you would like to print.
- Click the arrow or gear icon at the top right of the grid, and click Print Selected Rows.