
Table of Contents
Line Items How To
Line items represent bibliographic records on a selection list or purchase order. One line item corresponds to one bibliographic record. Line items contain attributes, which are characteristics of the bibliographic record, such as ISBN or Title. Line items also contain copy information, price information, notes, and alerts. Please see Line Items for an introduction to the parts of a line item. This chapter will assist in how to utilize line items.
Order Identifier Selector
Line items that are created from existing MARC records may have multiple ISBNs, ISSNs, or UPCs attached to the record depending on the type of item. Users are able to specify which order identifier to display in the purchase order sent to providers. Users with the right permissions can also add new order identifiers as needed.
This function helps to ensure that the correct edition of an item is ordered.
Select an identifier
1. Open the selection list or purchase order.
2. From the drop down menu, choose the appropriate ISBN, ISSN or UPC.

3. The identifier is automatically selected.
Add an Identifier
1. Open the select list or purchase order.
2. Highlight the existing identifier and type it in or paste your new identifier.

3. The new identifier is automatically added and selected.
Link Line Items to the Catalog
You can link a line item on a selection list to a corresponding MARC record in the catalog.
The link to catalog option enables you to search for a matching record and link the line item to it. The catalog record replaces the record originally used to create the line item. When Import Bibs and Copies is used, the copies are attached to the linked record in the catalog.
1. Open a selection list or purchase order.
2. On the line item you would like to link, click link to catalog.

3. The Locate Bib Record search box will appear in collapsed form in the upper left corner. You will need to grab the corner and expand the window.
4. By default the search box contains the item's ISBN, title, and author. Adjust your search terms as necessary.Use of a single search term is the most fruitful method of locating an existing bib record. You should begin by deleting all search terms except the ISBN.
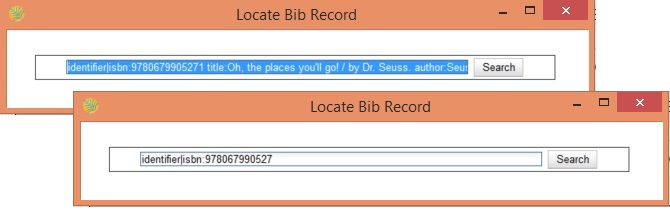
5. Click Search.
6. If there are results, View MARC Select appears. Although they appear on the same line together, View MARC and Select are two separate functions. View MARC allows you to view the MARC record that is your search result; and Select allows you to link the record found with the line item.

If there are no results, you will return to the search screen.
7. Click View MARC to view the MARC record of your selection. Click Hide to hide the MARC record.

8. If you are satisfied that the record is for the same item, click Select to link it to the record on the selection list or purchase order.
9. The screen will reload and the line item will display with a catalog link.
The line item is now linked to the MARC record in the catalog. This is the record that the holdings will attach to when you Load Bibs and Copies [link] into the catalog.

Line Item Worksheet
The Line Item Worksheet is designed to be a printable sheet that contains details about the line item, including alerts, notes, number of holds, and distribution information. The system fills in the worksheet as a line item goes through the acquisitions process. This worksheet can be placed in an item that is sent to cataloging or processing.
1. Open a selection list or purchase order.
2. Click the worksheet link on the line item for which you would like to view the worksheet.

3. The line item worksheet will appear.

4. The worksheet can be printed by clicking Print Page in the top right hand corner.
5. When you are finished, click Return to return to your selection list or purchase order.
Add a Copy to a Line Item
By default, line items have no copies attached to them. If a default for the number of copies has been specified for the provider in the provider record [link], then when line items are added to a purchase order the default number of copies is automatically added to each line item.
Use the Copies link to add copy information to a line item. You can add copies to line items on a selection list or a pending purchase order.
Copies can be added to line items in two ways:
- Via the Line Item Batch Updater [link] on a purchase order
- Via the Copies [link] link on a selection list or purchase order
Add Copies via the Line Item Batch Updater on a Purchase Order 1. Open a purchase order.
2. Enter the total number of copies for the line item in the Copiesfield on the Line Item Batch Updater.

3. Check the box(es) beside the line item(s) you wish to apply the copies to.
4. Click Apply to Selected.
5. The Copies (0) link will update to reflect the number of copies created for the line item.
Add Copies via the Copies link on a line item 1. Open a selection list or purchase order.
2. Click the Copies (0) link on the line item you would like to add copies to. This will take you to the Copies screen.

3. Enter the number of copies you would like to order into Item Count and click Go. A line will be created for each copy. See these below. Using the dropdowns, you can add the necessary information for each copy individually. This is helpful if each copy has differences, such as in funds, that aren't in the “normal” workflow.
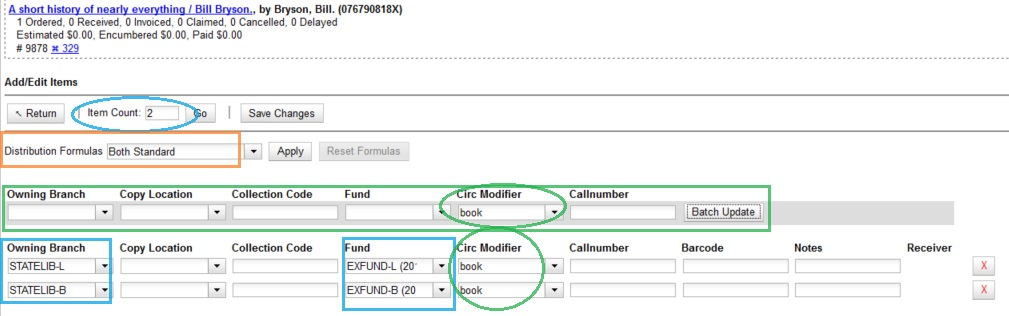
4. The gray box is a batch update function. You can use the batch updater for all of the fields or for single or multiple individual fields. For example, if all copies use the same circ modifier but are different in every other way you can use the batch updater to fill in the circ modifier for all copies. Each field in this box corresponds to the columns below:
- Owning Branch
- Copy Location
- Collection Code (only used for Brodart)
- Fund
- Circ Modifier
- Call Number
Enter your terms and click Batch Update. The copies will update to reflect your choices.
5. Distribution formulas are used as templates with the batch updater to specify the number of copies that should be distributed to specific branches. If you have set up distribution formulas, you may select a distribution formula from the Distribution Formulas drop down list. Click Apply. This will populate the Owning Branch, Fund, and Circ Modifier fields for your copies.
Distribution Formulas can be created by Acquisitions administrators; see Distribution Formulas.
6. Leave the barcode field blank. Evergreen will assign the copy a temporary barcode when Import Bibs and Copies is used [link].
your system short policy name a number (xxx), i.e. ACQSTATELIB123. The call number is the reverse, your system short policy name |
“ACQ” a number (xxx), i.e. STATELIBACQ123. Using these prefixes ensures copy identification on Acquisitions order records.
7. Once you have entered all the desired information, click Save Changes.
8. Click Return to return to your selection list or purchase order.
9. The Copies (0) link will update to reflect the number of copies you have created for the line item.

Add an Alert to a Line Item
Alerts are pop-up messages that appear when an item is received. Alerts also display on the Line Item Worksheet for the item.
1. Open a selection list or purchase order.
2. Click the Notes link.

3. Click New Alert.
4. Choose an alert code from the drop down menu. These Line Item Alert [link] codes are created by your Acquisitions Administrator.

5. Add additional comments if you desire.
6. Click Create. The alert will display on the screen.
7. Click Return to return to the selection list or purchase order.
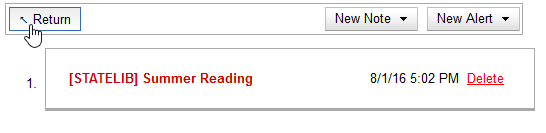
8. A red flag will now appear to the right of the Notes link and the Notes (0) link will update to display the total number of alerts and notes for the line item.

Add a Note to a Line Item
Notes on line items can include any additional information that you wish to add to the line item. Notes can be internal or can be made available to providers. Vendor notes appear on printed purchase orders. Notes also display on the Line Item Worksheet for the item.
1. Open a selection list or purchase order.
2. Click the Notes link.

3. Click New Note.
4. Enter your note.
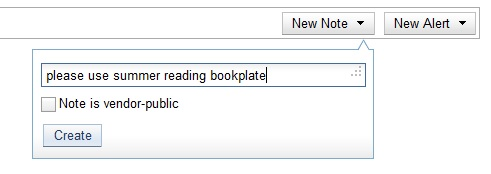
If you wish to make this note available to your provider, check the box adjacent to Note is vendor-public.
5. Click Create. The note will display on the screen.
6. Click Return to return to the selection list or purchase order.

7. The number in parentheses next to the Notes link will update to display the total number of alerts and notes for the line item.

Line Item Actions Menu
The line item actions menu provides you with a number of functions that can be applied to a particular line item.
Update Barcode
You are only able to update barcodes once a line item has been received.
1. Open a purchase order.
2. Using the Actions menu on the line item, select Actions→Update Barcodes.

3. The Create or Re-Barcode Items screen will open in a new tab.

4. See Adding Holdings to Title Records [link] to continue.
Holdings Maintenance
Once an item is received, it is possible to use the Actions menu to go directly to Holdings Maintenance to view and edit the holdings for a line item.
1. Open a purchase order.
2. Using the Actions menu on the line item, select Actions→Holdings Maint.

3. The Holdings Maintenance screen will open in a new tab.
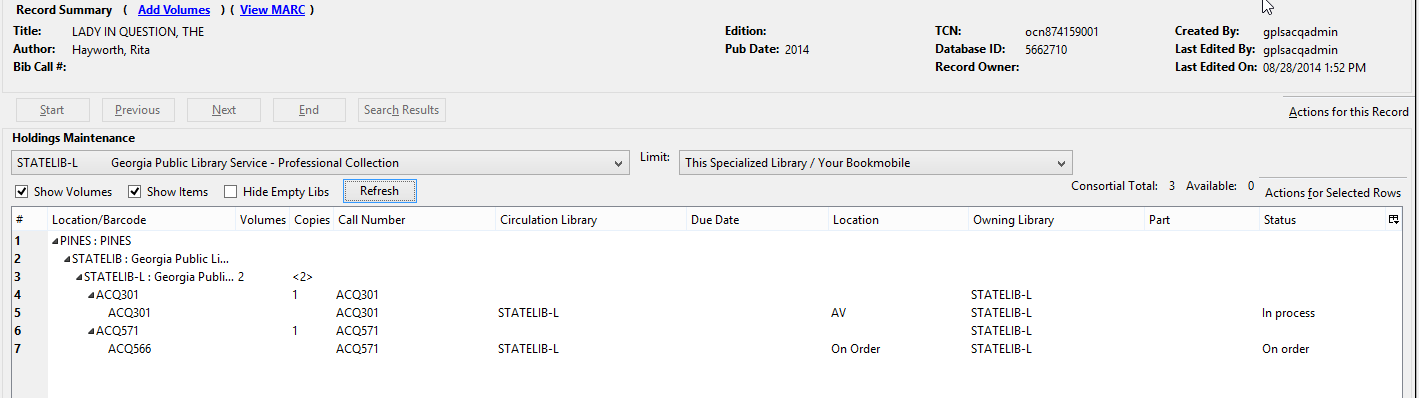
4. See Adding Holdings to Title Records [link] for further instructions.
Claims
You can manually claim a copy any time after it has been ordered until it is received. You can also claim copies that have been suspended.
1. Open a purchase order.
2. Using the Actions menu on the line item, select Actions→Claims.

3. Check the boxes adjacent to the copies you wish to claim and click Claim Selected.
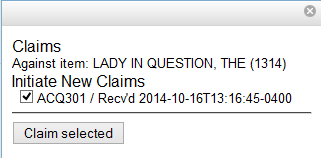
4. From the Claim Type drop down menu select the reason you are making the claim.

5. Enter a note if you desire and click Claim.

6. The number of existing claims on the line item updates.
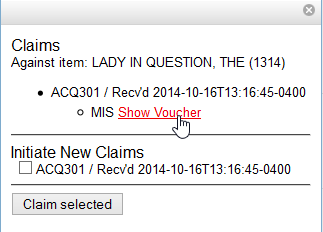
7. Using the Actions menu on the line item, select Actions→Claims (X existing).

8. The claimed items will appear in the top half of the pop-up with a link to their associated vouchers. Click Show Voucher.
View History
It is possible to view the changes that have been made to a line item.
1. Open a selection list or purchase order.
2. Using the Actions menu on the line item, select Actions→View History.

3. By default the newest changes appear first. Use the column headers to sort.

Estimated Price
The final column of a line item is Estimated Price. A purchase order will not activate without the Estimated Price field filled in for each line item.
The price entered into Estimated Price is the amount that will be encumbered for the item. It is also the amount that will appear in the price field of the copy editor for all copies created from this line item.
1. Open a selection list or purchase order.
2. Enter a price in the Estimated Price field for each line item. The price is automatically saved.
Canceling and Suspending Line Items
Delete a Line Item
Line items with the status of new, selector-ready, order-ready, or pending-order can be deleted.
Be sure you want to delete the line item as there is no warning message and once deleted line items cannot be un-deleted.
1. Open a selection list or purchase order.
2. Check the box(es) of the line item(s) you would like to delete.
3. Using the main Actions menu, select Actions → Delete Selected Items.
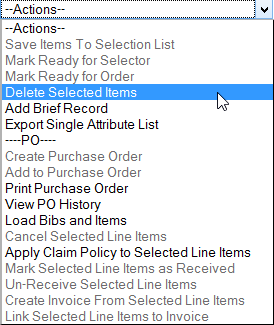
4. Your line item and the history associated with it will disappear.
Apply Funds to Line Items
You can apply a single fund or multiple funds to copies or line items on a selection list or a purchase order prior to ordering. Funds can be applied to line items from the Copies link that is located on a line item. Funds can also be applied or updated by using the batch updater for line items and their attendant copies.
Fund balance levels are indicated by color. A black fund name indicates that the fund has money to be spent. A yellow fund name indicates that the balance in the fund has dropped to the warning percent for the fund. A red fund name indicates that the balance in the fund has dropped to the stop percent for the fund. Funds that have been closed out will no longer appear on the drop down list.

Apply Funds to Line Items via the Batch Updater
You can apply funds to all copies on a line item using the Line Item Batch Updater on a purchase order.
1. Open a purchase order.
2. Check the box(es) of the line item(s) to which you would like to apply funds.
3. In the Line Item Batch Updater, select from the dropdown menu the fund you wish to apply to all line items.

4. Click Apply to Selected.
Apply Funds to Individual Copies
1. Open a purchase order.
2. On the line item you wish to apply funds to click the Copies link.

3. To apply a fund to an individual copy, click the drop down arrow in the Fund field for the copy and select the fund you would like to use. Ensure that all copies have a fund selected.

4. Click Save Changes.
5. Click Return to return to the purchase order.
Update Funds on Line Items via the Batch Updater
The fund in use for all copies on a line item can be updated at any time using the Line Item Batch Updater on a purchase order.
1. Open a purchase order.
2. Check the box(es) of the line item(s) for which you would like to update the fund.
3. Select the fund you wish to apply to the line items from the drop down menu of the Fund field on the Line Item Batch Updater.

4. Click Apply to Selected.
