
Table of Contents
Funds
Funds allow you to allocate credits toward specific purchases. In the funds interface you can create funds, allocate credits from funding sources to funds, transfer money between funds, and apply fund tags to funds.
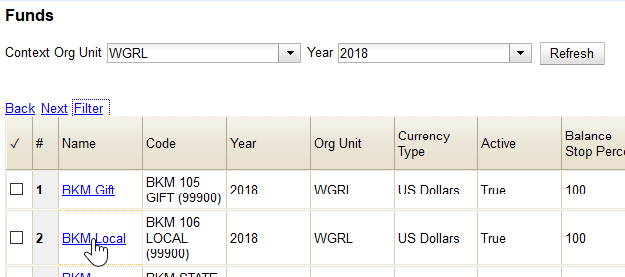
Funds are created for a specific year, either fiscal or calendar. These funds are owned by organizational units. Library systems with multiple branches can set a contextual organizational unit and year at the top of the funds interface. The drop-down menus at the top of the screen enable you to focus on funds that are owned by specific branches during specific years.
Considerations when creating funds
Funds are the main mechanism of “spending” money through the Acquisitions module, but they are also the main way of tracking how you spend your money. So some tips to help you decide how to organize your funds:
- What categories do you break down your budget into? Do you allocate $X every year to purchase juvenile books, and $X to purchase adult books? Are those lumped together and you don't require that kind of specificity? Is that broken down further into state funds for juvenile materials, state funds for adult materials, local funds for juvenile, etc.?
- Do you budget money specifically for different branches? If you have 2 branches, does Branch A have funds for Adult, Juv, local, state and Branch B have a separate amount/fund for those as well?
- How is your bookkeeping set up? Presumably you may have state funds and local funds, but are there specific local funds? When your bookkeeper sees the funds that you have billed out each purchase to, will they know how to code that in their accounting software?
- What do you want to be able to pull statistics on? Do you want to keep track of how much you've spent for a particular branch? For a particular collection (e.g. juvenile)?
- If you get processing done, is that billed to one particular fund/account for that purpose or is that cost rolled into the per-item price and coded to those funds?
- If you would like to have funds as part of your grid codes on Baker & Taylor's TS360 site, be aware that there is a 26 character limit per fund code. So name your funds accordingly.
Real Examples of Funds
Branch names and identifying details have been changed.
AUD J STL 310-XXXX-010101 (broken down by library, collection and fund source, and includes G/L code for bookkeeper)
AD STL 110-XXXXX-020202
HQ 101 LOCAL (010101) (broken down by branch and fund source)
BRA 310 STATE (020202)
Fund Owner
When creating funds, funds are all designated with an Org Unit which is considered the “owner” of the fund.
If you are not assigning funds on your vendor's website, you may choose to have the fund owner as either the system or may separate out funds by branch.
Create a fund
Libraries may want to create funds specifically for non-bibliographic purchases, such as processing supplies, or for other charges such as vendor charges for cataloging and/or processing.
Multi-branch libraries may have a single set of funds for their entire system, a set of funds for each branch, or may use a combination of funds at the branch and system levels.
1. Select Administration → Acquisitions Administration → Funds.

2. Click New Fund.

3. Fill in the fields.
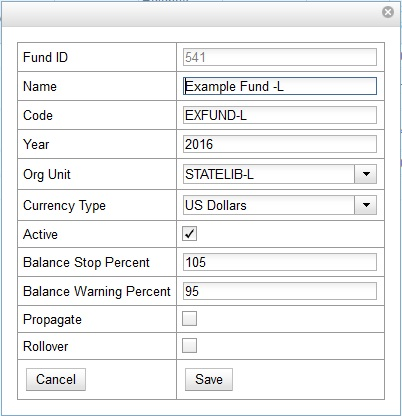
- Fund ID - Autosupplied by the system
- Name - There is no limit to the number of characters that can be entered in this field
- Code - Must be unique; there is no character limit
- Year - This can be a fiscal or calendar year. The format is YYYY.
- Org unit - This indicates the organizational unit(s) whose staff can use this fund.
- Currency Type - When a fund is applied to a line item or copy, the price of the item will be encumbered in the currency associated with the fund.
- Active - Check this box to activate the fund. You cannot make purchases from an inactive fund.
- Balance Stop Percent - This prevents you from making purchases when only a specified amount of the fund remains.
- Balance Warning Percent- This gives you a warning when the fund is low when the specified amount remains.
- Propagate- At year-end closeout, this will create a new fund in the new fiscal year with the same parameters as your current fund. All of the settings transfer except for the year and the amount of money in the fund.
- Rollover- This will roll over remaining funds and/or encumbrances during the fiscal year-end close out operation into the same fund for next year. This can be changed at any time.
4. Click Save.
5. Click Reload.
Edit a fund
While you are able to edit your fund's name, owner, and code, you are unable to edit the balance of your fund. A fund's balance can be adjusted by allocating monies to the fund or transferring monies to another fund.
1. Select Administration → Acquisitions Administration → Funds.
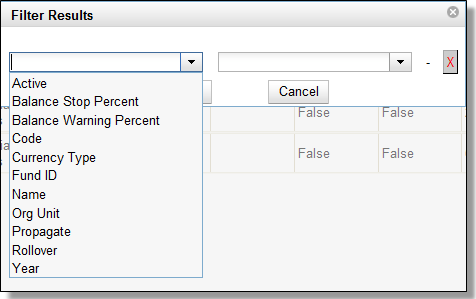
2. If needed, use the Context Org Unit menu, the Year and the Filter to locate the desired fund.

3. Double-click on the row you would like to edit. A pop-up box will appear in which you can edit the fields.

4. Make your changes and click Save.
Allocate credit to funds
Once you have set up your funds, credit can be allocated to them from your funding sources in two ways: from the funding source interface and via the fund interface.
Allocate credit via fund interface
1. Select Admin→Acquisitions Administration→Funds.
2. Click the hyperlinked name of the fund. The Fund Details screen will appear.
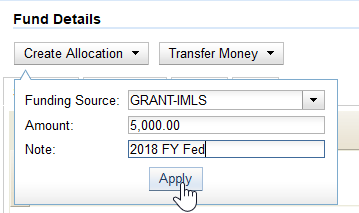
3. Click Create Allocation.

4. Choose a funding source code from the drop down menu.
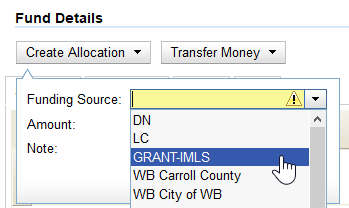
5. Enter the amount you would like to apply to the fund from the funding source.
6. Enter a note. (Optional)
7. Click Apply.
Transfer credit between funds
The credits that you allocate to funds can be transferred between funds if desired. The system tracks these transfers.
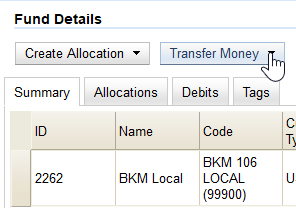
1. Select Admin→Acquisitions Administration→Funds.
2. Click the hyperlinked name of the originating fund. The Fund Detailsscreen will appear.
3. Click Transfer Money.
4. Enter the amount you would like to transfer.
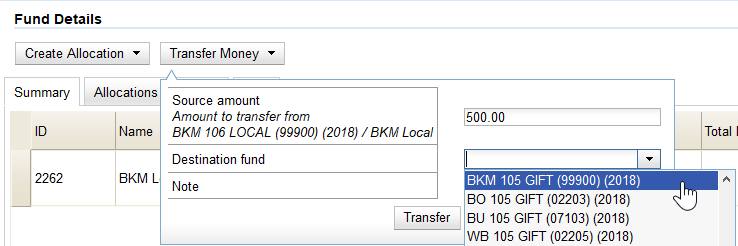
5. From the drop down menu, select the code of the destination fund.
6. Add a note. (Optional)
7. Click Transfer.

8. Click OK on the pop up menu that appears to confirm that you are ready to commit the transfer.
Track Balances and Expenditures
The Fund Details screen allows you to track a fund's balance, encumbrances, and amount spent.
1. Select Admin→Acquisitions Administration→Funds.
2. If needed, click Filter to use the filter to locate the desired fund.
3. Click the hyperlinked name of the fund you would like to view. The Fund Details screen will appear.
4. The Summary tab allows you to track the following:
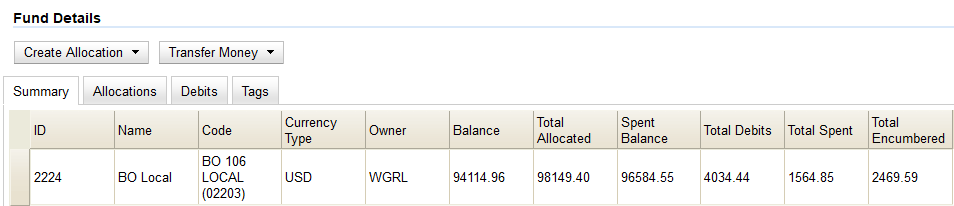
- Balance - Calculated by subtracting both spent and encumbered funds from the total allocated to the fund
- Total Allocated - Total monies allocated from the Funding Source(s)
- Spent Balance - Calculated by subtracting only the funds that have been invoiced (spent), from the total allocated to the fund. It does not include encumbrances
- Total Debits - Calculated by adding together the total spent and total encumbered
- Total Spent - Calculated by adding the cost of all items that have been invoiced. Does not include encumbrances.
- Total Encumbered - Calculated by adding all the encumbrances. Does not include items that have been invoiced.

5. The Allocations tab allows you to track credit allocated from funding sources, transfers to other funds, and transfers from other funds.
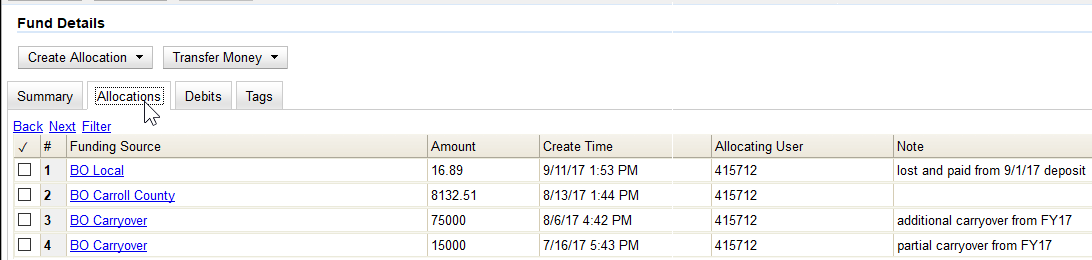
6. The Debits tab allows you to track all purchases made and monies encumbered against the fund.

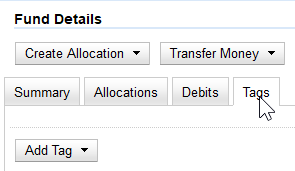
7. The Tags tab allows you to add and delete fund tags. See Fund Tags for more information.
Fund Tags
You can apply tags to funds to allow you to group funds for easy reporting. For example, you could create a Fiction tag and add the tag to all your fiction funds: Adult Fiction, Young Adult Fiction, and Children's Fiction. You are then able to run reports that include all fiction funds, rather than only reports on each separate fund.
Create a fund tag
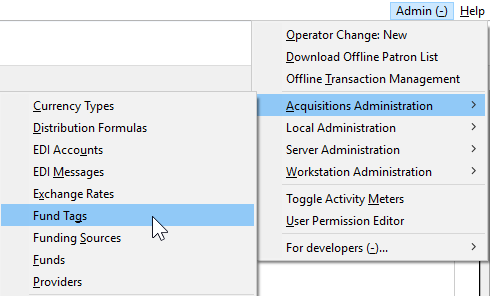
1. Select Admin→Acquisitions Administration→Fund Tags.
2. Click New Fund Tag.

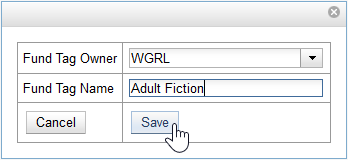
3. Select a Fund Tag Owner from the drop down menu. The owner indicates the organizational unit(s) whose staff can use this fund tag.
4. Enter a Fund Tag Name. There is no character limit.
5. Click Save.
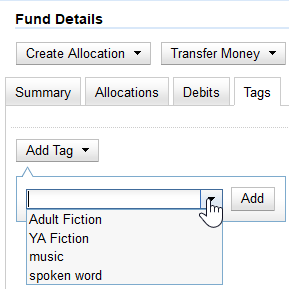
Add a tag to a fund
1. Select Admin→Acquisitions Administration→Funds.
2. Click the hyperlinked name of the fund you would like to add a tag to. The Fund Details screen will appear.
3. Click on the Tags tab.
4. Click Add Tag.
5. Select the tag from the drop down menu and click Add.
Delete a Fund Tag
1. Select Admin→Acquisitions Administration→Funds.
2. Click the hyperlinked name of the fund you would like to delete a tag from. The Fund Details screen will appear.
3. Click on the Tags tab.
4. Click the blue X beside the tag you would like to delete.
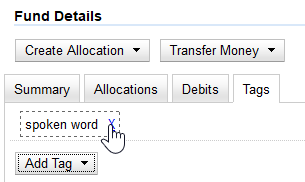
5. Click OK on the pop-up and the tag will be deleted.
6. Fund tags applied to the Parent Org Unit can also be deleted. Select Admin→Acquisitions Administration→Fund Tags.
7. Use the drop down to show tags available to the org unit.
8. Click in the checkboxes next to the tag or tags you wish to delete. Then click on Deleted Selected.
