Table of Contents
Line Items: How-To...
Use the batch updater
The batch updater is the way that we can add specific pieces of information to multiple copies at one time.
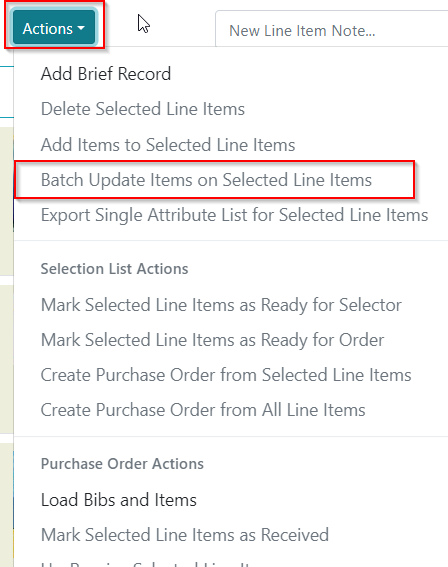
If you want to apply a specific attribute to multiple line items (and their copies) at once. That's located in Actions→Batch Update Items on Selected Line Items.
So if you have 1 copy on a line item with no circ mod, and you use the batch updater to add a circ mod it is replacing the previous value of nothing with the value of book/av/whatever. It will not add another copy with a different circ mod.
And if you have a value that already exists (e.g. like a fund) it will overwrite what is there already.
Required Fields
When you're adding attributes (branch/fund/etc) to your line items, there are a few fields that have required values to use vs. what you might normally use locally.
Shelving Location
Shelving location should always be left BLANK. There is a PINES-level setting that will apply the correct ON ORDER shelving location once you have submitted your orders.
Circulation modifier
Circulation modifier should always be left BLANK. There is a PINES-level setting that will apply the correct circ modifier once you have submitted your orders.
Cancel/Suspend
See Cancel/Suspend
Receive/Unreceive
Add Copies
While your purchase order is still in Pending status, you're able to add and remove copies from line items. You can see if a line item already has a quantity set by looking at the Items link on the line item.

If you use 9xx tags in your downloaded vendor carts, your line items might start out with quantities already auto-populated from your vendor carts. There are three different ways to add copies onto your line items:
- The PO-level Add Items Updater
Which of these methods you use depends on what information you already have and what you're trying to enter.
Use the PO-level batch updater when:
- You want to update just one (or more) fields on multiple line items, with the same value for each
Use the Items detail area when:
- You need to apply different information to different line items (EX: not all line items have the same branch)
- You have multiple copies on one line item and they need different information per copy (EX: 1 copy for BranchA with BranchA-Adult fund, 1 copy for BranchB with BranchB-Adult fund, etc)
Use the PO Add Items Updater when:
- You want to create additional copies to one or more line items, where the same information will be applied to them all
Items Detail Area
To access the Items Detail area of a line item, you can click on the Items link on an individual line item.

Here you'll see fields that you can update for this particular line item. You'll also notice there is a batch updater here, if you are applying the same value across all your copies on this line item.
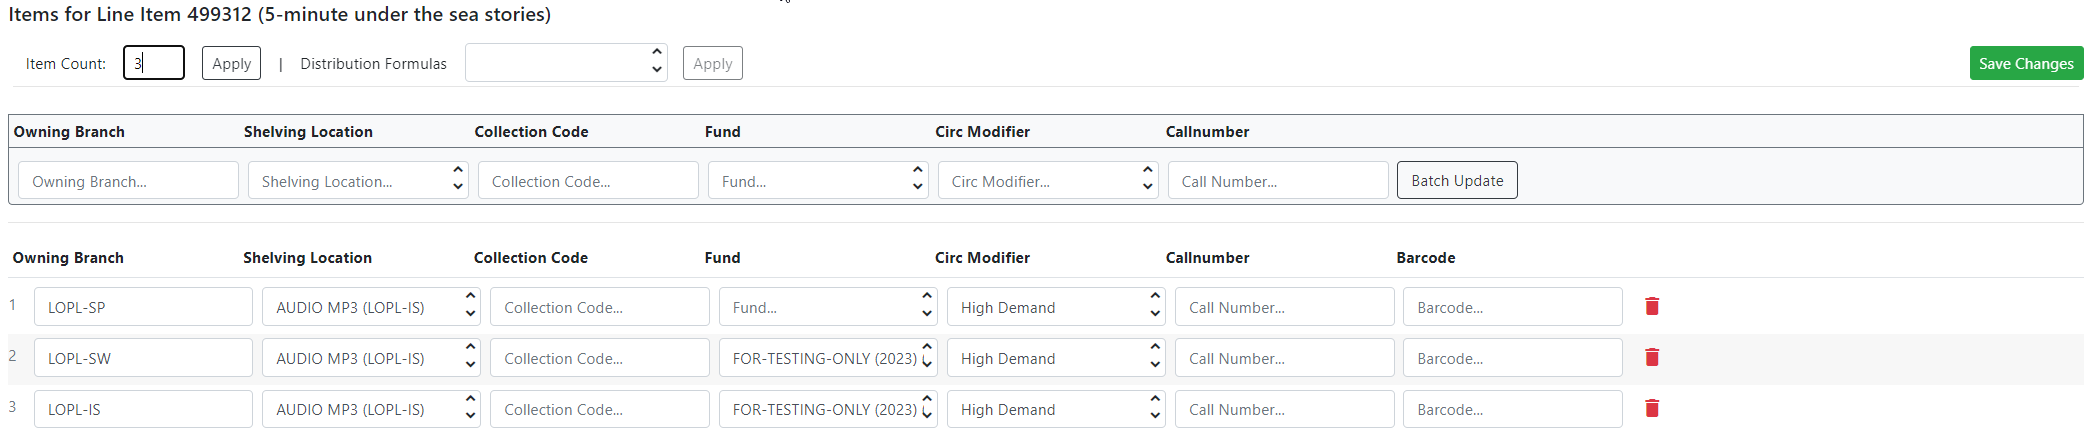
You can change any of these fields individually (like branch or fund).
If you need to add more copies to this particularly line item, you can change the number in the Item Count box and click Apply, and it will add more lines below.

If you need to take away any lines, you can click the red trash can next to any line to delete it.
Once you've made all of your changes, be sure to click the green Save Changes button on the far right, otherwise you'll lose all your edits.

Add Items Updater
The Add Items Updater is most useful when you're trying to add copies to multiple line items at once, with the same info across all of them.
So if you have line items with no quantity, you could use the Add Items updater to add 1 quantity (plus other attributes like branch/fund/etc) to your line items. In this circumstance, the regular batch updater would do the same thing because replacing 0 with 1 still makes 1.
However, it differs when you already have quantities set. So if you have line items with 2 copies already and you use the Add Items updater with a quantity set of 1, you would update those line items to have a quantity of 3.
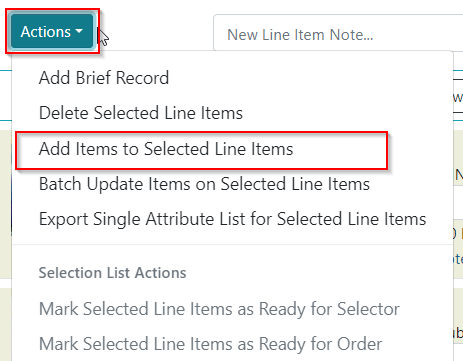
The Add Items updater can be found through Actions→Add Items to Selected Line Items.
You'll notice that here we have another batch updater, simply to make it easier if you're working with multiple copies that you're wanting to add.
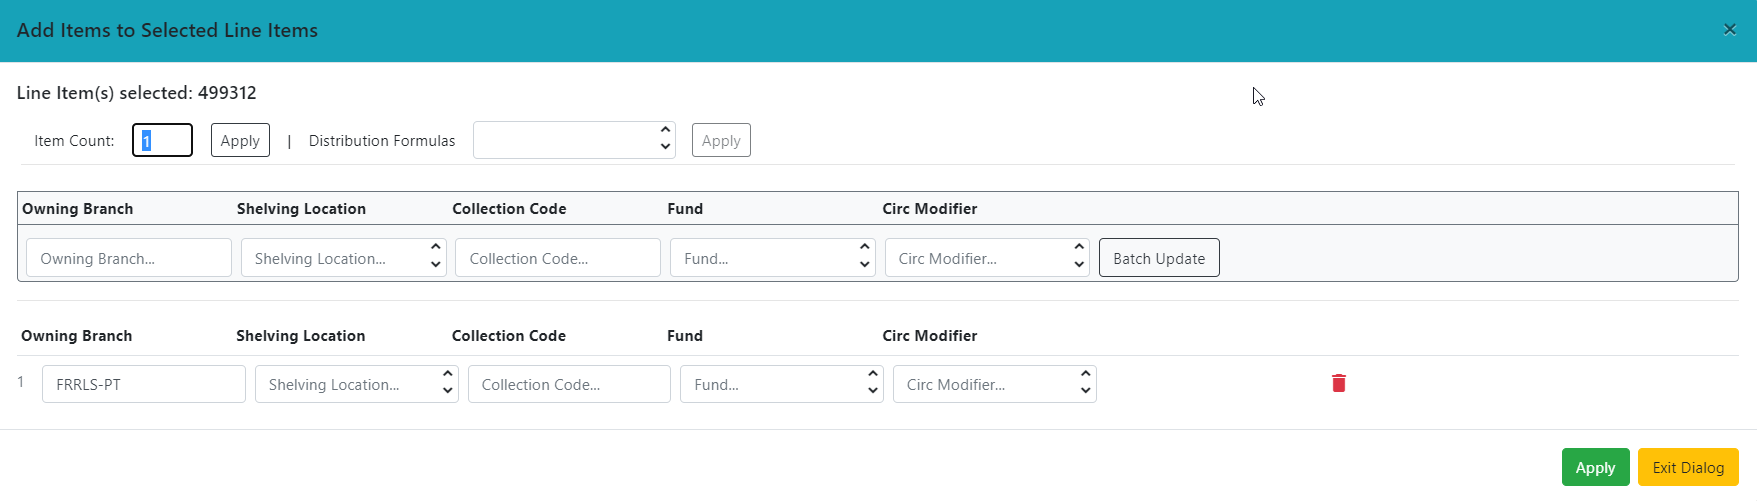
When using the Add Items updater, the Item Count box is particularly important since that's how many copies it's going to add onto your selected line items. It will default to one.

Once you've entered the correct quantity that should be added, you'll want to make sure your changes show in the lines below the batch updater.
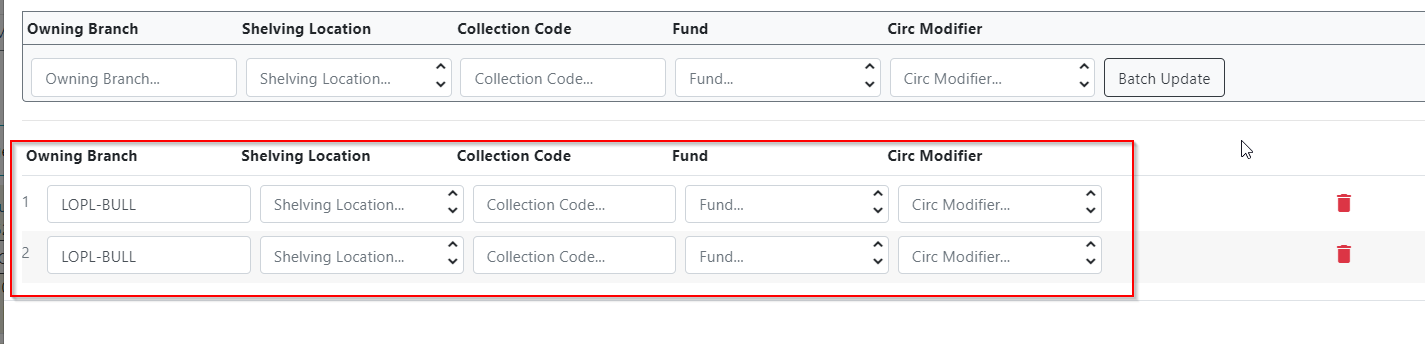
Since this time we're adding completely new copies, you'll want to fill out all the information that should be on the copy, including: Correct branch, fund, and circ modifier (if you use on-order holds).
Then you can click the green Apply button, and those copies will be added to the line items you selected.
Link to catalog
When you do your uploads through Load MARC Order Records, the piece of the upload process that takes the longest is that Evergreen looks at each title in your cart and then checks against our current catalog to see if there's a matching record. If there is, it links that line item to it and then goes to the next title. If there's no match, it creates one and then goes to the next title.
So this process of linking to catalog records is primarily done by your uploads. But there are circumstances where you'll need to manually link one of your line items to a catalog record.
1. Open your purchase order with the line item.
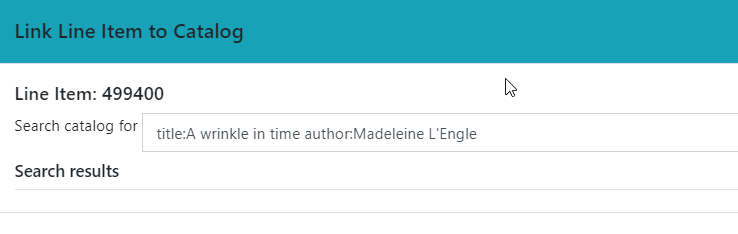
2. On the line item, click “Link to catalog.”

3. You'll get a popup that includes information about the line item, like its title, author, and the identifier number if it has one.
4. Click Submit.
Basically this is going to do a search of the catalog, so think of it in a similar way as if you were doing a search yourself. If these search terms don't end up getting you an appropriate record, you can add/delete information. EX: If including the ISBN means you don't get results, delete the ISBN:XXXX part of the field.
5. You'll get results in a list of possible record matches. You can use the white View Marc button for the record to pop out to the right so you can decide if it's a good match for your title you're ordering.
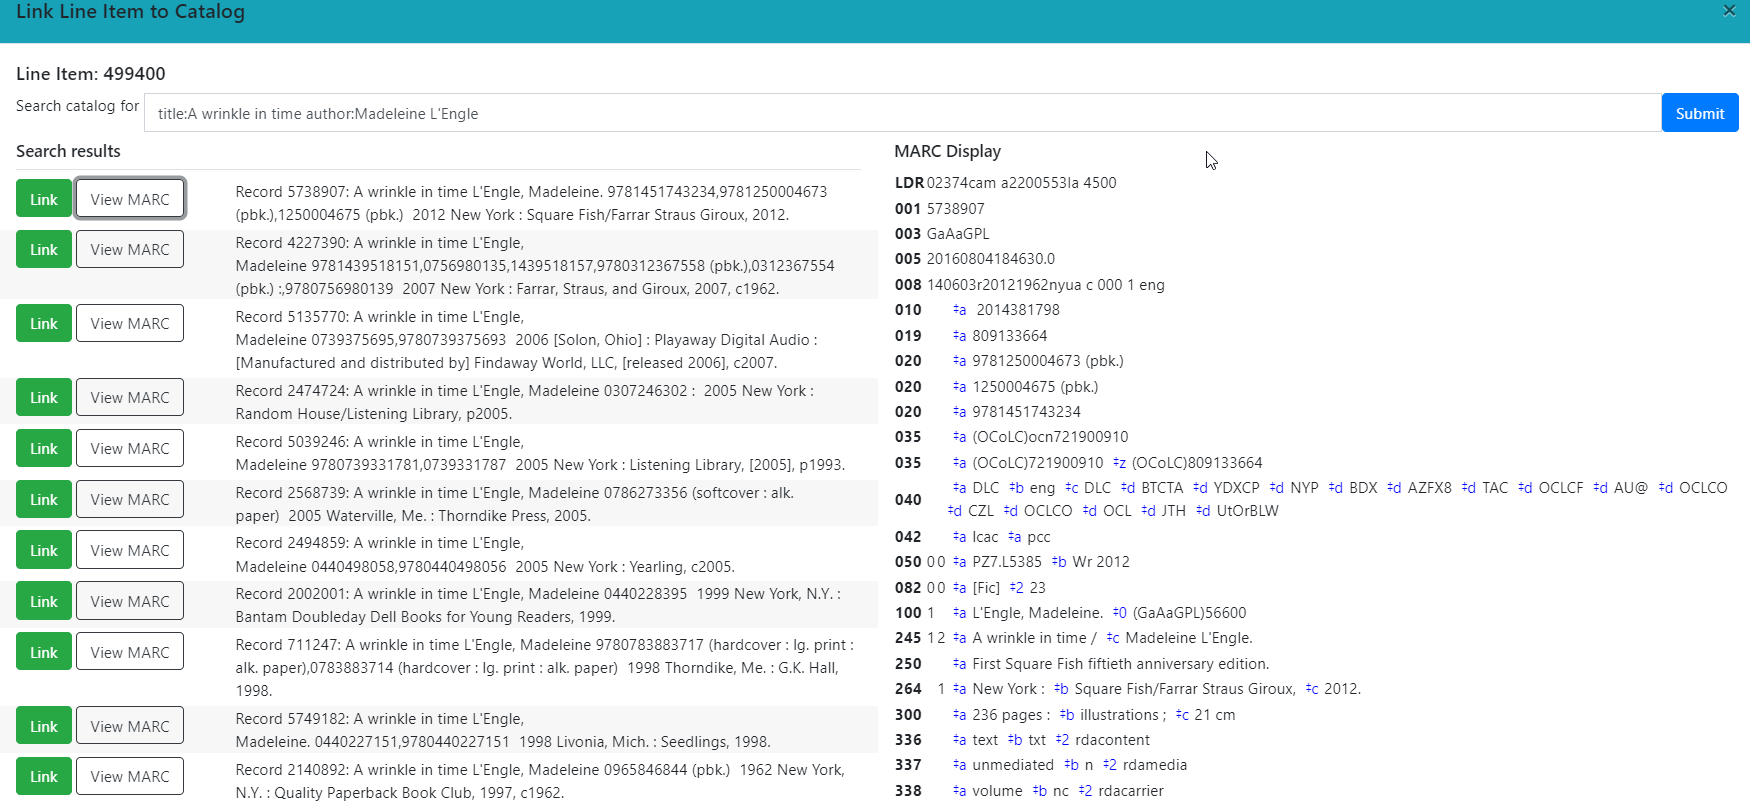
This is the record that your acquisitions copies will be attached to once you order, so make sure that it's representative of the title that you're ordering as best as you can.
6. Once you've decided which record is the best, click the green Link button next to that record. The popup will disappear, your PO will reload, and your line item is now linked to that catalog record.
Delete a line item
1. Open your purchase order.
2. Check the boxes of the line item(s) that you want to delete. You can either select specific line items, or use the Line Items in Page or All Line Items checkboxes.
3. In the actions menu, select Actions→Delete Selected Items.
4. You'll get a confirmation box to confirm that you want to delete the selected line items. Primarily you'll want to make sure that (a) you are intending to delete these line items and you didn't choose this on accident, and (b) that the expected number of line items are showing. That is, if you intended to delete one and it shows you have 20 selected, you should Exit.

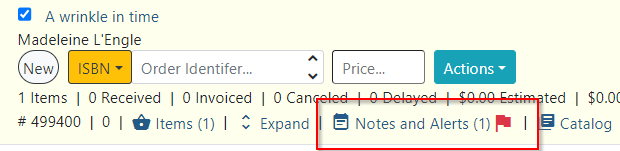
Add notes and alerts
Notes
You can add an informational note to all or specific line items. This could be a note for yourself for later, a note for someone receiving the item, or you can make a particular note vendor-public to send to a vendor in an EDI order.
To add a note to one line item:
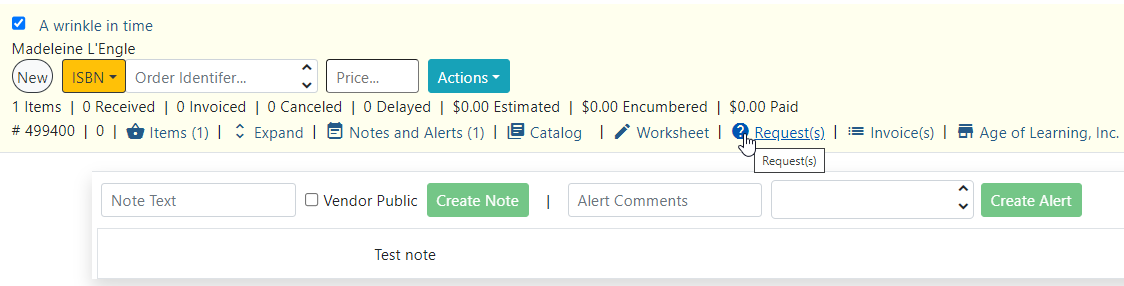
1. On the line item that you want the note to apply to, click Notes and Alerts.
2. You'll see an area dropdown where you can enter both Notes and Alerts. Notes is on the left. Enter your Note text.

3. If you want the note to be passed to the vendor in your EDI order, click the “Note is vendor-public” ticky box.
4. Click the green Create Note button.
5. You'll now see the counter by your line item's Notes and Alerts has gone up, and you can see your Note text below.
To add a note to one or more line items:
1. Select the line items that you want the note to be applied to.
2. The Note field is at the top of the PO. You can enter your note text in the main field.

3. If you want the note to be passed to the vendor in your EDI order, click the “Note is vendor-public” ticky box.
4. Click Apply to Selected.
5. Your PO will reload, and you'll notice that the counter next to Notes and Alerts on your line item has gone up. You can click that to see your note.
To close the Notes and Alerts area, click the red X on the far right.
Alerts
Alerts are pre-defined messages that can popup whenever a line item is received. Alerts are set up by either PINES or your local ACQAdmin. See: Line Item Alerts.
To add an alert to a line item:
1. Open your purchase order.
2. On the line item that you want to add the alert, click the Notes and Alerts.
3. The area for Alerts is on the right. Click in the dropdown first to select which type of alert it is.

4. You can add comments in the Alert Comments field if you wish.
5. Click the green Create Alert button.
6. You'll now see your alert below.
To close the Notes and Alerts box, click the red X on the far right.
You can now see that your line item has a little red flag next to Notes and Alerts to indicate that there's an alert on this line item.