
Table of Contents
Invoices : How To...
Create a blank invoice
Sometimes you may need to just create an invoice that's not associated with an Acquisitions purchase order. Maybe you ordered something outside of Acquisitions and you don't need to worry about on-order copies in the catalog, or you're not worried about keeping track of encumbrances because you already have the invoice in hand. You might also need to just account for some direct charges–like a service–and don't need to have a purchase order.
In these cases, you can create a blank invoice that's not associated with any purchase order. You can later link the invoice to a purchase order if you'd like to, but it won't be done automatically.
Select Acquisitions→Create Invoice.

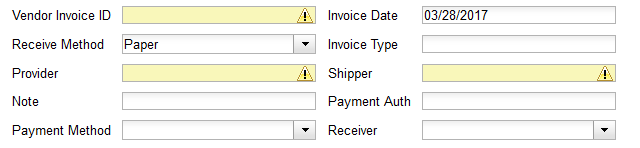
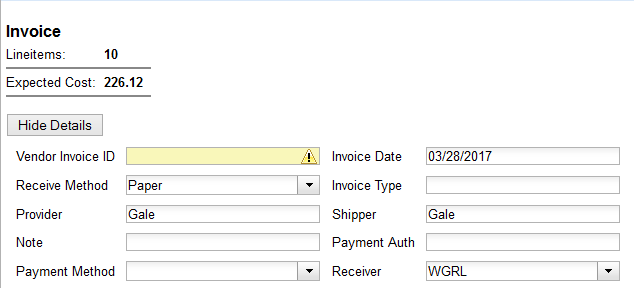
Fill in the top section of the invoice. See Invoice Details for guidelines on filling in this information.
There are two options for saving an invoice:

Click Save to save the changes you have made and keep the invoice open.
Click Save and Clear to save the invoice and open a blank invoice.
For information on linking line items to the invoice, see Populating Invoices.
For information on adding charges to the invoice, see Add Charges to an Invoice.
For information on receiving line items through an invoice, see Receive Line Items From an Invoice.
Once you're satisfied with the invoice, you can Save one more time and then hit Close. This will mark your invoice as closed, create the debits in your fund, and mark those debits immediately as “spent”. So your “spent balance” (how much you've been invoiced for) will increase, and your overall balance will decrease.
Create an invoice with all lineitems on a PO
You can create an invoice containing all of the line items on a purchase order.
Open a purchase order. Click Create Invoice.

A new invoice will open in the same tab.
Fill in the top section of the invoice. See Invoice Details for guidelines on filling in this information.
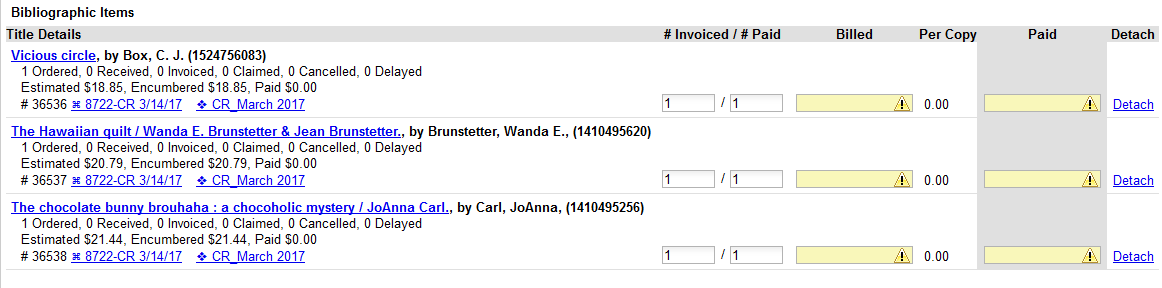
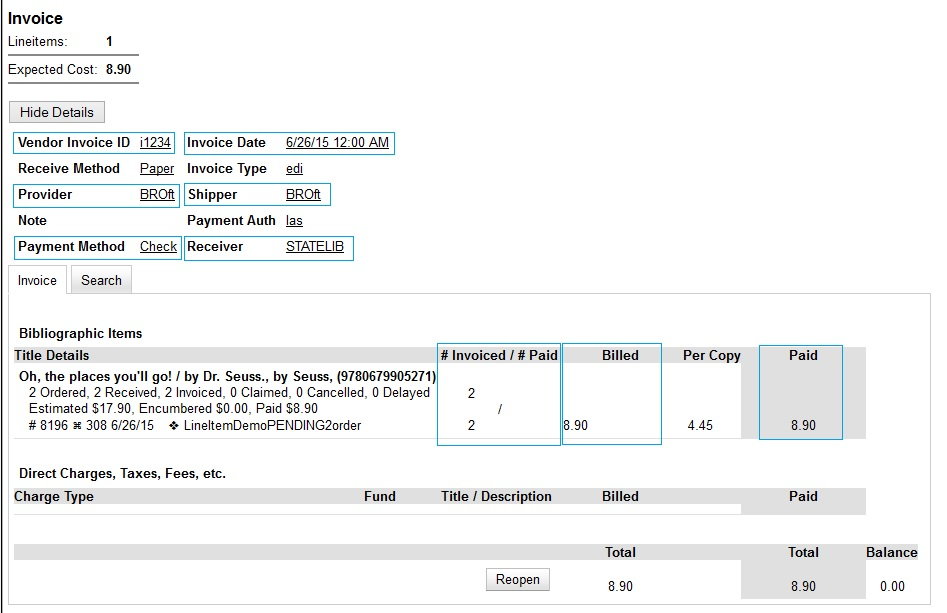
The Bibliographic Items section of the invoice will list all of the line items from the purchase order along with Title Details for each line item.

Title Details includes:
- Title
- Author
- ISBN/identifier
- summary of copies ordered, received, invoiced, claimed, and canceled
- summary of amounts estimated, encumbered, and paid
- line item ID number
- link to the Selection List (if used)
- link to the Purchase Order
The # Invoiced and the # Paid fields will have auto-populated with the number of copies available to be invoiced for the line item. These fields can be updated as needed.
Enter the amount billed into the Billed field. The Paid field will auto-fill to match.

There are two options for saving an invoice, Save and Save & Clear.
Click Save to save the changes you have made and keep the invoice open. Click Save and Clear to save the invoice and open a blank invoice.
The following fields are required to save the invoice:
- Vendor Invoice ID
- Provider
- Shipper
- Payment Method
- # Invoiced
- # Paid
For information on linking additional line items to the invoice, see Populating Invoices.
For information on adding charges to the invoice, see Add Charges to an Invoice.
For information on receiving line items through an invoice, see Receive Line Items From an Invoice.
For information on other invoice options and features, see the other sections in this chapter.
Create an invoice with only some lineitems on a PO
You can create an invoice from multiple line items on a purchase order. You can then link additional line items from the same or different purchase orders to this invoice.
Open a purchase order.
Check the boxes beside the line items you would like to use to create your invoice.

Using the main Actions menu, select Actions → Create Invoice from Selected Line Items.

A new invoice will open in the same tab.
Fill in the top section of the invoice. See Invoice Details for guidelines on filling in this information.

The Bibliographic Items section of the invoice will list all of the line items selected from the purchase order.
The # Invoiced and the # Paid fields will have auto-populated with the number of copies available to be invoiced for the line item. These fields can be updated as needed.

Enter the amount billed into the Billed field. The Paid field will auto-fill to match.
There are two options for saving an invoice:
- Click Save to save the changes you have made and keep the invoice open.
- Click Save and Clear to save the invoice and open a blank invoice.
For information on linking additional line items to the invoice, see Populating Invoices.
For information on adding charges to the invoice, see Add Charges to an Invoice.
For information on receiving line items through an invoice, see Receive Line Items From an Invoice.
For information on other invoice options and features, see the other sections in this chapter.
Remove line items from an invoice
Open an invoice.
Click the Detach link adjacent to the line item you wish to remove.

Confirm that you wish to detach the line item by clicking OK on the pop-up that appears.

If your invoice is complete and contains proratable charges, click Prorate.
Use one of the two options for saving an invoice and proceed.
Add a direct charge
Open an invoice.
Click the Add Charge link.

Choose the charge you would like to apply from the Charge Type drop down menu.

Using the drop down menu, choose the fund from which payment for the charge will come.
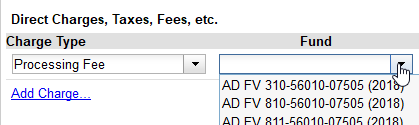
Enter a Title/Description of the charge.

In the Billed and Paid fields, enter the amount billed and the amount paid respectively.

Use one of the two options for saving an invoice. Invoices can be reopened at a later date if adjustments are required.
Delete a direct charge
An invoice must be open in order to delete charges from it.
Open an invoice.
Click the Delete link adjacent to the charge line.

Confirm that you wish to delete the charge by clicking OK on the pop-up that appears.
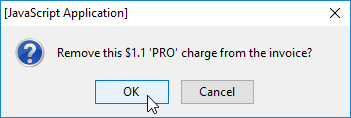
The charge is deleted and removed from the invoice.

Use one of the two options for saving an invoice. Invoices can be re-opened at a later date if adjustments are required.
Close an invoice
Closing an invoice is the process that moves your money from being encumbered to being “spent”. You also need to close invoices before you can print the invoice and see the “Amount Spent by Fund” portion of the printed invoice in Acquisitions.
To close an invoice:
Open an invoice.
Ensure information is entered into all of the required fields.
Required fields are:
- Vendor Invoice ID
- Provider
- Payment Method
- Invoice Date
- Shipper
- Receiver
- # Invoiced/# Paid
- Billed
- Paid
The totals at the bottom of the invoice will calculate based on the information entered.
Click Close. This will complete the invoice. The invoice screen will refresh, and the Reopen button will appear in the place of the Save, Save & Clear, Prorate and Close buttons.
Print an invoice
You cannot print an invoice when you're actually viewing the invoice itself. The way that Evergreen builds and puts together the nicely formatted invoice is through a trigger process instead of your browser, so you can't just hit print when you're viewing your invoice.
1. If you are currently viewing your invoice, you can hit your browser's BACK button to return you to the search screen that has a list of invoices.
2. Check the ticky box to the left of your invoice.
3. At the top, click the button that says Print Selected Invoices.