
Table of Contents
Troubleshooting FAQs
Funds
Vendor Credits
You may encounter a situation where you've received a credit from a vendor. You should account for this in Acquisitions, since it presumably means that you have that much more money to spend out of your budget.
Before actually creating the credit, you may want to do some preliminary homework to gather information.
- Did the credit originate from a particular item on a purchase order? You may want to revisit that purchase order to see what fund you originally billed it out to. You will probably want to credit that fund back the refund amount, so take note of what fund it is.
- If the credit originates from a purchase on a PO, take note of the PO ID.
- Take note of the balance of your fund that you would like the credit applied to. You'll want to check it again after you save and close the invoice, to be sure that it increases by the amount of the credit.
To create the vendor credit:
If your credit originated from an item on a purchase order:
- Open that purchase order.
- Click the “Create Invoice” button.
If your credit did not originate with a PO:
- From the navigation bar at the top of the client, choose Acquisitions→Create Invoice.
Continue Here:
- After you've completed one of these two scenarios, continue filling out the invoice.
- Include the vendor invoice ID, choose your provider, and Shipper should be your normal context ordering agency (your system or branch).
- Create a direct charge. Your item type may vary depending on the situation. If the charge was originally for physical items, “Materials” is probably the most appropriate. If you received a credit from one of your newspapers, you may want to choose “Serial Subscription.” You may want to include some info in the Notes field, like “Refund for damaged Patterson audiobook.”
- Choose your fund that you want the credit to be applied to.
- In the Billed and Paid boxes, enter the amount of the credit as a negative number, e.g. -9.74.
- Save and Close the invoice.
- Go back to your funds page and ensure that your balance increased by the amount of the credit.
Used Wrong Fund
Sometimes you have already activated a PO only to realize that you used the wrong fund (whether that means there's not enough money in the one you used, or that it was inappropriate for the purchase). You may even have an open or closed invoice that is currently using that fund for that line item.
You can change the fund on a line item at any point in the process by using the batch updater on the purchase order. You cannot change funds at the copy level, only at the line item level.
Zeroing out a fund
Often you may have funds that you would like to fully spend down to zero at the end of the fiscal year (e.g. state funds). There is no native way in Evergreen to do this; you're not able to split a particular transaction or item between two funds. This solution is a bit of a workaround, but if you definitely need to spend a fund exactly down to zero this is my recommendation for doing so.
1. Remove the stop and warning limits on the fund(s) that you would like to zero out.
2. Activate a PO using the fund(s) that you would like to zero out. Try to overencumber the fund by as little as possible, but to get it down to zero you most likely will need to overencumber it unless you have an item that's exactly how much you need to spend.
3. Once the items are received and you have the invoice, determine how much total you are over on that fund.
4. If you are only using one fund on that line item–
- Reduce the Amount Billed and Amount Paid on that line item by the total amount you are over on the fund.
4b. If you are using multiple funds on that line item–
- Divide the total amount you are over on your funds by the number of items on that line item. Hold onto this number; you'll use it in a moment.
- Reduce the Amount Billed and Amount Paid on that line item by the total amount you are over on the fund.
5. Create a direct charge on the invoice with type “Materials”. Use whatever fund you would like for the “spillover” (possibly Local money).
5a. If you only had one fund on the line item, the amount should be the total amount you reduced your line item by.
5b. If you had multiple funds on the line item–
- You will need to create multiple direct charges–one for each “spillover” fund
- Type should be Materials for each one.
- Amount for each one should be the divided amount that you calculated in step #4b.
6. Save and close the invoice.
7. Look at your fund balances to ensure that your fund balances are now zero and that the spillover money was debited from the correct fund(s).
Budget Cut
It is sometimes the case that after you have allocated your monies from your funding sources to your funds, your funding is cut and you need to decrease the available amount in your funds.
Because we cannot remove money completely from the system (money is always tracked somewhere, it can't just disappear), it is a good idea to create a fund each year called REMOVE-MONEY or FUNDS-CUT, etc. Once you know how much you need to remove from each of your funds, do a transfer from the fund to be cut (e.g. BranchA-Fiction) to the REMOVE-MONEY fund.
It is a good idea to include an explanation or some sort of info in the Note field when you do the transfer, so that you understand later why the money was transferred.
This way the balance of your fund decreases to the appropriate amount, and there is a record of where the money has gone.
Invoices
Move processing fee to another invoice
Some vendors send a separate invoice with a processing and/or cataloging fee as the only charge(s). If you prorate your cataloging/processing charges, you may want to move this onto another invoice that contains the titles so that it can be prorated across all the funds used for the materials.
You need to delete the charge, not just remove the fund info.
Purchase Orders
PO activation fails when funds past limit
If you activate your purchase order, bibs and copies load, and then you receive the error that one or more funds are past their warning limit and the order remains unactivated. You may change the funds that you are using, and to activate the order you choose “Activate without loading bibs and copies”. Otherwise you will create multiple acq barcodes in the system. If you have done this by accident, please submit a Helpdesk ticket to get the issue corrected.
Undeleting Bibs to Activate Purchase Order
If your lineitem has had its bib deleted from underneath it, you will need to undelete the bib record so you can activate your purchase order.
1. Pull up the bib record using either the Record ID or the TCN.
2. You can confirm that the bib is indeed deleted by checking the Record Summary at the top of the bib record.
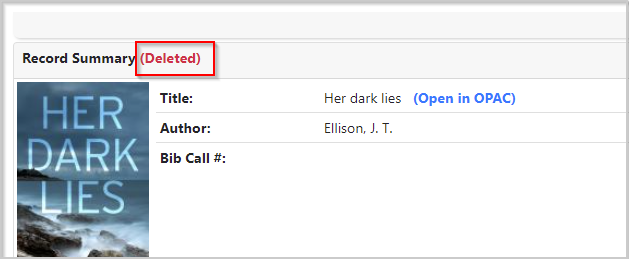
3. If the bib is indeed marked deleted, go to to the Marc Edit tab.
4. On the right side of the screen, there's a blue button that says “Undelete record.”

5. Click that button. It will ask you to confirm if you want to undelete, so click Confirm/Yes. The page will refresh and you'll notice there's no longer the red (Deleted) in the Record Summary.
6. Once you've undeleted all the bibs marked as deleted on your report, you can activate your purchase order.