
Table of Contents
Label Printing (Sheets)
Sheet (page) label printing uses letter size stock with laser, deskjet, or similar printers. With Evergreen’s sheet printing interface, you can print whole or partial sheets of either spine or spine and pocket labels. Printing to 8” X 11” (letter) size stock is standard with printers so you do not need to set up special stock in printer preferences. You do need to make sure that your browser is not inserting headers and footers or overwriting margin settings.
Browser Print Settings
In your browser's print preferences, you will need to disable the margins, headers, and footers for best results.
In Firefox
- File > Page Setup
- Format & Options tab: Make sure that “Shrink to Fit Page Width” is not checked.
- Margins & Header/Footer tab: Set Margins to 0 and all Headers/Footers to blank.
- Click OK.

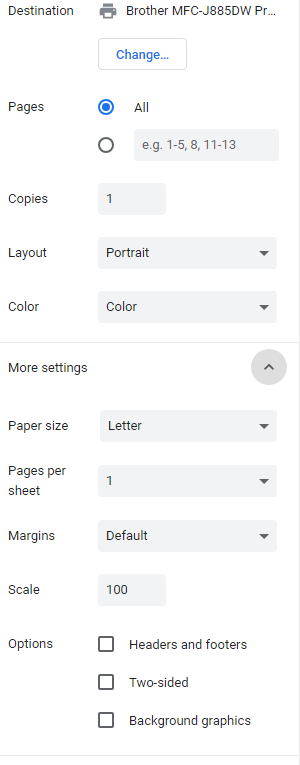
In Chrome
- Menu (three vertical dots in upper-right corner of browser window) > Print
- Select the label printer.
- Click More Settings.
- Check the Paper Size for Letter.
- Set Margins to None.
- Set Scale to 100.
- If present, uncheck Headers and footers.
- Click Cancel.
Open the Label Printing Interface
To set-up printing in Evergreen, you will need to open the Label Printing interface. There are four different places where you can print labels:
At cataloging
- In the Holdings editor, go to the Defaults tab and check the box for Print Item Labels on Save & Exit.
- Add items or call numbers and items, Save & Exit.
- Print Labels will open in another tab.
- Make any edits needed for call number spacing under the Call Number tab.
- The Print Labels interface will open after Save & Exit until you uncheck the box.
From Item Status
- Go to the Item Status List View Search > Search for items by barcode or Circulation > Item Status).
- Scan or enter one or more barcodes.
- Select the items needing labels (you can print all or a subset).
- Under the Actions menu, go to Show > Print Labels.
From Item Buckets
- Place barcodes in bucket for label printing
- Go to the Item Buckets page (Cataloging > Item Buckets).
- Open the bucket used for label printing.
- Select the items needing labels (you can print all or a subset).
- Under the Actions menu, go to Show > Print Labels.
From Holdings View
- Go to the Holdings View for a title.
- Select the items needing labels.
- Under the Actions menu, go to Show > Print Labels.
Creating and Using Templates
You may print labels on the fly by using or modifying the default template, you may create and save your own templates, or you may import templates created by another person. You may have multiple templates to accommodate special print jobs such as narrow books.
To create a template
Before modifying any settings, type a name into the Template field and click Save. You may now make any changes needed to your template.
To create a different template, type in a new name and click Save. Make any changes needed for the new template.
Using templates
To choose a different template, use the drop-down menu, choose your template, and click Apply.

Call Number Template Tab
Use this section to modify the general format in which the text will appear on spine labels. This will determine which fields and free text will appear on the spine label, and where the line breaks will appear by default. Use this section to modify the general format in which the call number will appear on spine labels. This will determine which parts of the call number (if you use prefixes and suffixes) and how inserted free text will appear on the spine label and where default line breaks will appear. Most PINES libraries have not implemented separate call number prefixes or suffixes.
This formatting is saved as part of your templates.

Call Numbers Tab
Use this section to finely control how each spine label prints. For example, if you have a long call number with a skinny book, you may make changes to the display to adjust that individual spine label without affecting other spine labels. There is currently no way to edit information in the pocket label at this point.
Any changes you make on this tab are not saved to your template; they are on the fly changes.

Settings Tab
Use this section to define the size, spacing, and fonts of your spine and pocket labels. Some field are optional and there to provide additional spacing and font control only if needed.
Print Feed Option: Sheet
Starting Position on Label Grid: Allows you to choose the starting label on the sheet and print to full sheets or a used, partial, sheet. The upper-left label is row 1, column 1. If you've already used the first 5 labels on a sheet of labels that is 4 labels wide and 8 labels tall, you would enter row 2, column 2.
Label Set Configuration
Spine Label vs. Pocket Label: (required)
- Only printing spine labels – Spine label
- Printing both spine and pocket labels – Pocket label
Number of Labels in set: (required)
- To print spine and pocket labels – Enter 2
- To print single spine labels – Enter 1
- To print multiple copies of the same label – Enter the number of sets you need. (e.g. to print two copies of the same label, enter 2)
Column 1/Column 2: (required)
- To print spine and pocket labels – Col 1: spine label || Col 2: pocket label
- To print single spine labels – Col 1: spine label || Col 2: N/A
- To print multiple copies of the same label – Col 1: spine label || Col 2: spine label
Printing sheets of spine labels examples
For a full sheet

For a partial sheet

Printing two copies of a spine label

Printing spine and pocket labels


Page Settings
Page Margins:
Top: (required) This is the top outer margin for the overall page printing to a sheet
Left: (required) This is the left outer margin for the overall page printing

Print Grid Size: (required) This is the number of total number of rows and columns on your label stock.
Gap between Rows: (optional) The amount of vertical space between one row and the next.
Gap between Label Sets: (optional) If there are multiple labels in a set (eg, a spine and pocket label pair), then this can add a horizontal space between the sets.
Gap between Columns: (optional) The amount of horizontal space between columns.
Font & Label Settings
Item Print Label Font Family: (optional) Defaults to Monospace. Other known supported fonts:
- Arial
- Arial Black
- Comic Sans MS
- Courier
- Courier New
- Garamond
- Georgia
- Helvetica
- Impact
- Times New Roman
- Trebuchet MS
- Verdana
Item Print Label Font Size: (optional) Defaults to 10pt. If modified, should use “pt” after number. (Example: 10pt)
Item Print Label Font Weight: (optional) Defaults to normal. Options: bold, italic
Item Print Label - Inline CSS: (optional) Allows you to inject arbitrary CSS into the item print label template. You can also edit the CSS directly on the Label Template tab.
Item Print Label - Call Number Wrap Filter Height: (required) How many lines can be printed on the spine label
Item Print Label - Call Number Wrap Filter Width: (required) How many characters can be printed on the spine label before forcing the number to wrap
Item Print Label - Left Margin for Spine Label: (required) How much space to insert between the left side of the spine label and the beginning of the text. You may need to adjust this for proper spacing.
Item Print Label - Left Margin for Pocket Label: (required for pocket labels) How much space to insert between the left side of the pocket label and the beginning of the text. You may need to adjust this for proper spacing.
Item Print Label - Height for Spine Label: (required) Overall height of the spine label
Item Print Label - Width of the Spine Label: (required) Overall width of the spine label
Item Print Label - Height for Pocket Label: (required for pocket labels) Overall height of the pocket label
Item Print Label - Width of the Pocket Label: (required for pocket labels) Overall width of the pocket label

Label Template Tab
If you need to control the actual content that appears on the pocket label, or if you need to make extra changes to the CSS, you may do it on this tab.
Be sure to complete filling out the Settings tab and Save your work before moving to this tab.
To add fields to the pocket label, scroll to the bottom section of the Label Template tab. You will see the code that has been generated for the label layout you have defined. You may add additional fields in this section, change the order of the fields, or modify how the fields wrap. The highlighted area below shows the area you may edit to add or modify fields. Be careful not to modify the rest of the code on the page, or it can break your template. (If this happens, click Default to reset the template to default settings and start over.)

If you do not understand the HTML and CSS that is shown, export the template you have to an external file, then attach it to a Help Desk ticket along with what you are trying to do, and the PINES staff will assist you.
Common Fields to Add or Modify
Library Policy (Short) Name: {{col.c ? col.c['call_number.owning_lib.shortname'] : ''}}
Shelving Location: {{col.c ? col.c['location.name'] : ''}}
Publication Date: {{col.c ? col.c['call_number.record.simple_record.pubdate'] : ''}}
Title (limited to 30 characters): {{col.c ? (get_bib_for(col.c).title | limitTo:30) : ''}}
Author (limited to 30 characters): {{col.c ? (get_bib_for(col.c).author | limitTo:30) : ''}}
Price: {{col.c ? col.c['price'] : '' | currency}}
You can add multiple fields to one line with spaces in between the fields. For example, if you want to add the library's policy name after the barcode, enter it as such:

As long as you exactly paste in the given code for a field (like shelving location or title), the fields will be arranged on the pocket label exactly as you place them in the Label Template tab.
For example, if you enter the code for Title, add in 5 spaces, and then the code for shelving location on the same line, on your pocket label it will have the Title, 5 spaces, and then the shelving location. See below:


Text Rotation for Skinny Spine Labels
Several libraries have requested the ability to print the spine labels sideways to be able to print more characters in one row on a single spine label for thinner spines. To do this requires editing the code on the Label Template tab and adjusting the settings for call number wrapping.
1.Look for this section towards the bottom of the page:
<pre class="{{col.cls}}" style="border: none; margin-bottom: 0; margin-top: 0; overflow: hidden;" ng-if="col.cls === 'spine'"> {{col.c ? get_cn_for(col.c) : ''}}</pre>
And replace it with this:
<pre class="{{col.cls}}" style="border: none; margin-bottom: 0px; margin-top: 0px; overflow: hidden;" ng-if="col.cls === 'spine'"><div style="transform:rotate(90deg);margin-top:35px;"> {{col.c ? get_cn_for(col.c) : ''}}</div></pre>
2. Go to the Setting tab and change the “Item Print Label - Call Number Wrap Filter Height” to 1 (for one line)
3. Change the “Item Print Label Call Number Wrap Filter Width” to at least 15 (or however many characters can print on the one line).
Moving the Call Number Down on the Spine Label
You can use the 'Item Print Label - Inline CSS Field' to fine-tune some of the settings. For example, if you want your spine labels to start partway down the label rather than at the top of the label, you can add this text into the Inline CSS field:
.spine{padding-top:30px}
Different Font Size for Spine and Pocket Labels
You can make the spine label have a different font-size from the pocket label by setting the regular font size using 'Item Print Label Font Size' and then using the 'Item Print Label - Inline CSS Field' like this (where 14pt is the desired font size):
.spine{font-size:14pt;}
Importing and Exporting Templates
After you create your template(s), it is a good idea to save a backup copy of it in case you need to switch computers or in case you lose your current settings. You may also want to share your templates with other staff. If you have multiple templates, they will export as one file; there is no need to export each template individually.
- Click the Export button.
- Save it to the location of your choosing.
- You may change the name of the file, but do not change the file extension.
To load saved templates, click Import and select the template file. Templates with the same name will automatically overwrite existing templates. Templates with different names will be added to the workstations existing templates.